Blog
Hugo 정적 사이트 생성기를 활용한 기술 블로그 제작
- -
정적 사이트란?
정적 사이트 (Static Site) 란 로그인, 회원 가입, DB 등 사용자 정보에 따라 동적으로 작동하는 웹이 아닌 그 누가 접속하더라도 똑같은 결과를 보여주는 순수 HTML (+CSS, JS) 로만 이루어진, 말 그대로 정적인 상태를 유지하는 사이트를 뜻한다. 블로그에 글을 작성할 때 마다 일일히 HTML 파일을 작성할 수는 힘들기 때문에 정적 사이트 생성기 (Static Site Generator) 라는 프로그램들이 존재한다. 대표적으로 Jekyll, Gatsby, Hugo, Hexo 등이 있다.
Jekyll
- Ruby 기반
- Github Pages에 내장되어 있어 github과 연동해서 사용하기 편함
- 테마, 플러그인, 관련 자료 풍부
- 페이지 수가 많아지면 기하급수적으로 빌드 속도가 느려짐
Gatsby
- React 컴포넌트 사용할 수 있음
- GraphQL 사용 가능
- 공부해야 할 것이 많다
Hugo
- Go 기반
- 빌드 속도가 매우 빠름
Hexo
- node.js 기반
필자는 Hugo를 활용하여 자신만의 블로그를 구축하는 방법을 소개하겠다.
설치
brew install hugohomebrew로 손쉽게 설치할 수 있다.
테마 선택
이곳에서 본인이 원하는 블로그 테마를 선택할 수 있다. 필자는 hugo-coder 라는 테마를 사용중이다.
새 블로그 생성과 테마 적용
hugo new site <블로그 이름>
cd <블로그 이름>
git init
git submodule add <테마 github 주소> themes/<테마 이름>
themes/<테마 이름> 디렉토리에 들어가면 exampleSite 라는 디렉토리가 있는데, 그 안에 있는 config.toml 파일을 복사하여 최상위 경로의 config.toml에 덮어씌운다. 이 과정을 따로 커맨드로 정리하지 않은 이유는 테마마다 config 파일 확장자가 다를 수 있고, 심지어 config 파일의 경로가 다를 수 있기 때문이다. 결론적으로는 exampleSite 디렉토리 안의 폴더 구조와 최상위 경로의 구조를 같게 하면 된다.
config 파일 수정
현재 기본 config 값은 이렇게 되어있다.
baseURL = "http://www.example.com"
title = "johndoe"
theme = "hugo-coder"
languageCode = "en"
defaultContentLanguage = "en"
paginate = 20
pygmentsStyle = "bw"
pygmentsCodeFences = true
pygmentsCodeFencesGuessSyntax = true
enableEmoji = true
# Enable Disqus comments
# disqusShortname = "yourdiscussshortname"

[params]
author = "John Doe"
# license = '<a rel="license" href="http://creativecommons.org/licenses/by-sa/4.0/">CC BY-SA-4.0</a>'
description = "John Doe's personal website"
keywords = "blog,developer,personal"
info = ["Full Stack DevOps", "Magician"]
avatarURL = "images/avatar.jpg"
#gravatar = "john.doe@example.com"
dateFormat = "January 2, 2006"
since = 2019
# Git Commit in Footer, uncomment the line below to enable it
commit = "https://github.com/luizdepra/hugo-coder/tree/"
# Right To Left, shift content direction for languagues such as Arabic
rtl = false
# Specify light/dark colorscheme
# Supported values:
# "auto" (use preference set by browser)
# "dark" (dark background, light foreground)
# "light" (light background, dark foreground) (default)
colorScheme = "auto"
# Hide the toggle button, along with the associated vertical divider
hideColorSchemeToggle = false
# Series see also post count
maxSeeAlsoItems = 5
# Custom CSS
customCSS = []
# Custom SCSS, file path is relative to Hugo's asset folder (default: {your project root}/assets)
customSCSS = []
# Custom JS
customJS = []

# If you want to use fathom(https://usefathom.com) for analytics, add this section
# [params.fathomAnalytics]
# siteID = "ABCDE"
# serverURL = "analytics.example.com" # Default value is cdn.usefathom.com, overwrite this if you are self-hosting

# If you want to use plausible(https://plausible.io) for analytics, add this section
# [params.plausibleAnalytics]
# domain = "example.com"
# serverURL = "analytics.example.com" # Default value is plausible.io, overwrite this if you are self-hosting or using a custom domain

# If you want to use goatcounter(https://goatcounter.com) for analytics, add this section
# [params.goatCounter]
# code = "code"

# If you want to use Cloudflare Web Analytics(https://cloudflare.com) for analytics, add this section
# [params.cloudflare]
# token = "token"

# If you want to use Matomo(https://matomo.org) for analytics, add this section
# [params.matomo]
# siteID = "ABCDE" # Default value is "1", overwrite this if you are cloud-hosting
# serverURL = "analytics.example.com" # For cloud-hosting, use provided URL, e.g. example.matomo.cloud

# If you want to use Google Tag Manager(https://analytics.google.com/) for analytics, add this section
# [params.googleTagManager]
# id = "gid"

# If you want to implement a Content-Security-Policy, add this section
[params.csp]
childsrc = ["'self'"]
fontsrc = ["'self'", "https://fonts.gstatic.com", "https://cdn.jsdelivr.net/"]
formaction = ["'self'"]
framesrc = ["'self'"]
imgsrc = ["'self'"]
objectsrc = ["'none'"]
stylesrc = [
  "'self'",
  "'unsafe-inline'",
  "https://fonts.googleapis.com/",
  "https://cdn.jsdelivr.net/"
]
scriptsrc = [
  "'self'",
  "'unsafe-inline'",
  "https://www.google-analytics.com",
  "https://cdn.jsdelivr.net/"
]
prefetchsrc = ["'self'"]
# connect-src directive – defines valid targets for to XMLHttpRequest (AJAX), WebSockets or EventSource
connectsrc = ["'self'", "https://www.google-analytics.com"]

[taxonomies]
category = "categories"
series = "series"
tag = "tags"
author = "authors"

[[params.social]]
name = "Github"
icon = "fa fa-2x fa-github"
weight = 1
url = "https://github.com/johndoe/"

[[params.social]]
name = "Gitlab"
icon = "fa fa-2x fa-gitlab"
weight = 2
url = "https://gitlab.com/johndoe/"

[[params.social]]
name = "Twitter"
icon = "fa fa-2x fa-twitter"
weight = 3
url = "https://twitter.com/johndoe/"

[[params.social]]
name = "LinkedIn"
icon = "fa fa-2x fa-linkedin"
weight = 4
url = "https://www.linkedin.com/in/johndoe/"

[[params.social]]
name = "Medium"
icon = "fa fa-2x fa-medium"
weight = 5
url = "https://medium.com/@johndoe"

[[params.social]]
name = "RSS"
icon = "fa fa-2x fa-rss"
weight = 6
url = "https://myhugosite.com/index.xml"
rel = "alternate"
type = "application/rss+xml"

[languages.en]
languageName = ":uk:"

[[languages.en.menu.main]]
name = "About"
weight = 1
url = "about/"

[[languages.en.menu.main]]
name = "Blog"
weight = 2
url = "posts/"

[[languages.en.menu.main]]
name = "Projects"
weight = 3
url = "projects/"

[[languages.en.menu.main]]
name = "Contact me"
weight = 5
url = "contact/"

[languages.pt-br]
languageName = ":brazil:"
title = "João Ninguém"

[languages.pt-br.params]
author = "João Ninguém"
info = "Full Stack DevOps e Mágico"
description = "Sítio pessoal de João Ninguém"
keywords = "blog,desenvolvedor,pessoal"

[[languages.pt-br.menu.main]]
name = "Sobre"
weight = 1
url = "about/"

[[languages.pt-br.menu.main]]
name = "Blog"
weight = 2
url = "posts/"

[[languages.pt-br.menu.main]]
name = "Projetos"
weight = 3
url = "projects/"

[[languages.pt-br.menu.main]]
name = "Contato"
weight = 5
url = "contact/"
여기서 사이트 주소, 제목, 작성자, 날짜 형식, 프로필 사진, 한 페이지 당 게시물 수 등을 설정할 수 있다. 이 테마는 다국어 (브라질어) 를 지원하는 것 같은데, 필자는 다국어 페이지를 사용할 일이 없어 브라질어 관련 설정은 모두 지워 아래와 같이 설정하였다.
baseURL = "https://devleo.wtf"
title = "Devleo"
theme = "hugo-coder"
languageCode = "en"
defaultContentLanguage = "en"
paginate = 20
pygmentsStyle = "bw"
pygmentsCodeFences = true
pygmentsCodeFencesGuessSyntax = true
enableEmoji = true
# Enable Disqus comments
# disqusShortname = "yourdiscussshortname"

[params]
author = "Devleo"
description = "Devleo's Idea Note"
keywords = "blog,developer,personal"
info = ["Backend Developer", "Daydreamer"]
avatarURL = "images/cloud.png"
dateFormat = "January 2, 2006"
since = 2022
rtl = false
colorScheme = "auto"
hideColorSchemeToggle = false
maxSeeAlsoItems = 5
customCSS = []
customSCSS = []
customJS = []

[params.csp]
childsrc = ["'self'"]
fontsrc = ["'self'", "https://fonts.gstatic.com", "https://cdn.jsdelivr.net/"]
formaction = ["'self'"]
framesrc = ["'self'"]
imgsrc = ["'self'"]
objectsrc = ["'none'"]
stylesrc = [
  "'self'",
  "'unsafe-inline'",
  "https://fonts.googleapis.com/",
  "https://cdn.jsdelivr.net/"
]
scriptsrc = [
  "'self'",
  "'unsafe-inline'",
  "https://www.google-analytics.com",
  "https://cdn.jsdelivr.net/"
]
prefetchsrc = ["'self'"]
connectsrc = ["'self'", "https://www.google-analytics.com"]

[taxonomies]
category = "categories"
series = "series"
tag = "tags"
author = "authors"

[[params.social]]
name = "Github"
icon = "fa fa-2x fa-github"
weight = 2
url = "https://github.com/d3vle0/"

[[params.social]]
name = "RSS"
icon = "fa fa-2x fa-rss"
weight = 6
url = "index.xml"
rel = "alternate"
type = "application/rss+xml"

[languages.en]
languageName = ":uk:"

[[languages.en.menu.main]]
name = "About"
weight = 1
url = "about/"

[[languages.en.menu.main]]
name = "Blog"
weight = 2
url = "posts/"

[[languages.en.menu.main]]
name = "Tags"
weight = 3
url = "tags/"
이렇게 config 파일을 수정했다면 사이트를 미리보기 해보자.
hugo serverhttp://localhost:1313 에서 미리볼 수 있다.
글 작성하기
hugo new posts/<글 제목>.md여기서 입력한 <글 제목> 은 url 부분에 들어가게 되니 영어 소문자와 - 만을 사용하는 것을 권장한다. 그러면 content/posts/<글 제목>.md 파일이 생겨나는데, 실제로 표시될 글 제목과 날짜, 작성자, 태그를 지정할 수 있도록 템플릿이 생겨난다.
+++
draft = true
date = 2022-05-18T00:09:27+09:00
title = ""
description = ""
slug = ""
authors = []
tags = []
categories = []
externalLink = ""
series = []
+++
draft 는 초안인지 아닌지 기록하는 것인데, 이는 빌드 시 웹사이트에서 실제로 해당 글을 표시할지 말지를 선택하는 것이다. false로 해야 표시가 된다.
위의 템플릿 밑으로 markdown 문법으로 글을 작성해나가면 된다.
disqus 적용하기
disqus에 로그인을 하고 이곳을 눌러 자신의 사이트에 들어갈 댓글창을 만든다.

pricing 화면에서는 basic을 subscribe하면 된다. 왼쪽 바에서 general 을 누르면 Shortname 을 확인할 수 있는데, 이 shortname을 config.toml에서 주석처리 되어있는 disqusShortname 에 넣으면 된다. 꼭 hugo-coder 테마처럼 맨 윗부분에 있지는 않을 수도 있다. 자신이 선택한 테마의 config 파일을 잘 살펴보다가 disqus shortname을 입력하는 부분이 있으면 그곳에 복사해주자. 그리고 disqus 사이트에서 표시되었던 Shortname 밑에 Website URL에 자신의 블로그 도메인을 입력한다.
실제 배포
github repository를 만들고 블로그 폴더를 통째로 push 한다. 정적 사이트를 자동으로 배포해주는 서비스인 netlify를 활용해서 serverless 환경에서 블로그를 배포할 예정이다.
netlify에서 github login을 하고 Add new site > Import an existing project > github을 차례대로 누른 뒤 조금 전 push한 repo를 선택한다.

위와 같이 자동으로 hugo 프로젝트임을 감지한 것을 확인하고 deploy site를 누른다.
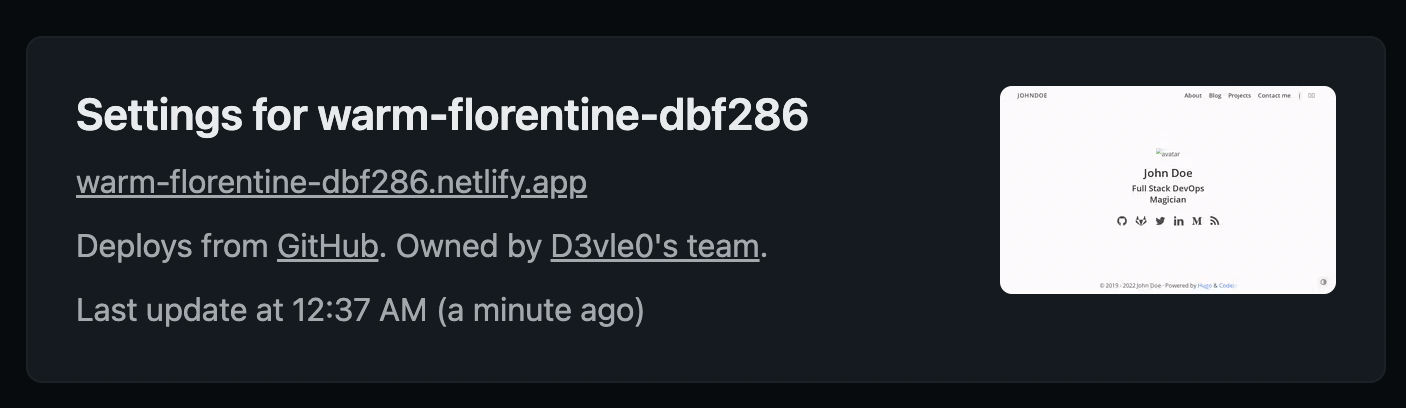
도메인이 netlify에서 랜덤으로 지정한 도메인이다. 이제 자신만의 도메인을 연결해보자.
도메인 설정
namecheap에서 자신만의 도메인을 구매해보자.
사이트 설정 > Domain Management 에서 Add custom domain 버튼을 누른다.

자신의 도메인을 입력하고 verify. 몇 분 뒤 자신만의 도메인이 적용된 것을 확인할 수 있다.
소감
원래 hugo를 사용해오다가 내가 마음에 드는 테마들이 jekyll에 많아서 jekyll로 갈아탈까 고민을 했었지만 친구의 겨우 몇 페이지짜리 정적 사이트가 빌드 되는데 수 초를 기다려야 하는 (github에 push 하는 속도보다 더 오래걸린다) 광경을 보고 hugo를 사용하는 것이 편하다고 느꼈다. hugo는 빌드 속도가 ms 단위이기 때문이다.
2022년 5월 17일 작성한 글입니다.
'Blog' 카테고리의 다른 글
| 딥 웹에 비밀 블로그 만드는 방법 (Hugo) (0) | 2024.02.19 |
|---|
Contents
소중한 공감 감사합니다